Cheapo Power: Power Control on the Cheap
Frequently, it is very useful to be able to turn appliances on and off, programmatically. There are dozens of home automation systems out there to help you do this: X10, Insteon, Z-Wave, Lutron, Belkin WeMo, and so many more. I personally use Insteon. However, they all have one thing in common: They are quite expensive on a per-module basis. On average, you can expect to spend $50-$60 for each device you want to control. This can be a huge barrier to entry.
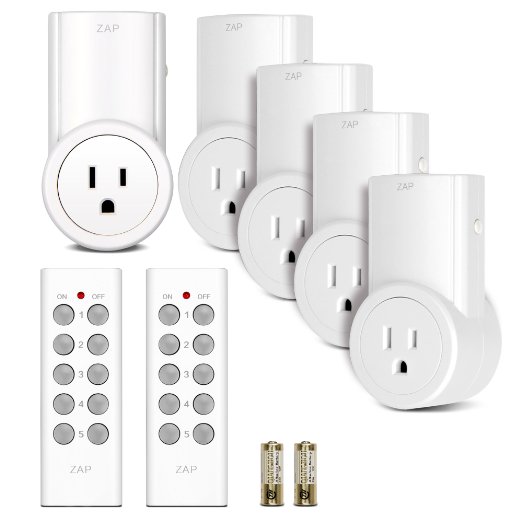
I set out to find a way to control appliances cheaply. I started by buying this wirelessly controlled set of outlets on Amazon. The complete set costs only $40 CAD, and includes five wirelessly controlled outlets and two remotes. That's 2/3 the cost of a single Insteon module.
My first instinct was to open up the remote and build a circuit that simply 'pretends' to press the buttons. This ended up being much more complicated than I initially thought, since the remote uses a single-chip RF solution that expects direct 12V inputs from the buttons. This required building a PNP-NPN gate of transistors for each button. I only had enough IO on my ESP8266 board to drive 8 of them, so here is the first version.
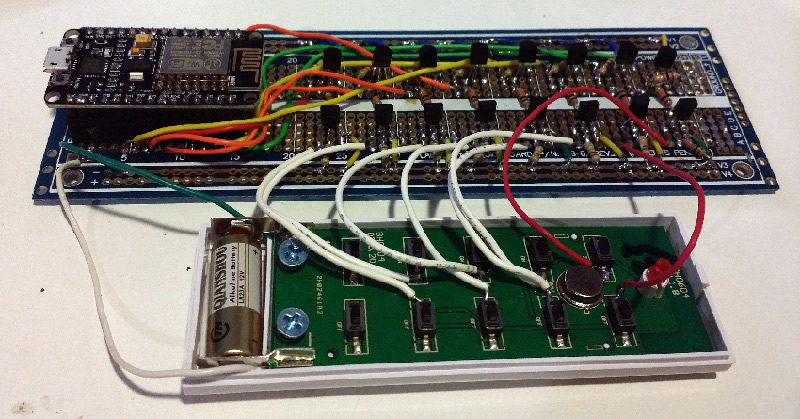
This circuit actually worked just fine, but it had a few limitations: First, it is large and took 2 hours to solder. Second, it relies on the original remote and its battery. The battery could die, or the remote could break -- something that actually happened to one of the two remotes. And finally, it only allows control of four unique module groups. This may be enough, but it wasn't enough for my needs. There had to be a better way.
Reverse Engineering the Radio Protocol
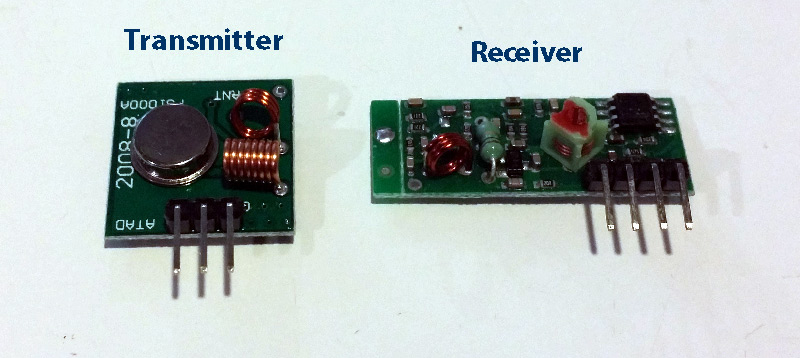
Reverse-engineering the RF protocol seemed like it would be complex, so I was initially wary to try. But thought I'd give it a shot. A friend loaned me a set of 433mhz modules -- a transmitter and a receiver. (These can be purchased on Amazon for about $2 each here) I hooked the receiver module to power, and used a Logic Analyzer to capture the packets as I pressed buttons on the remote. Pretty soon I was seeing what looked like data:

I pressed a few more buttons, and pretty quickly I had some data to work with:

Hey, look at that. There's a real pattern emerging! The first bunch of lines are looking the same. Also, the last few are the same for 'On' and for 'Off', respectively. Maybe we can add some colors:
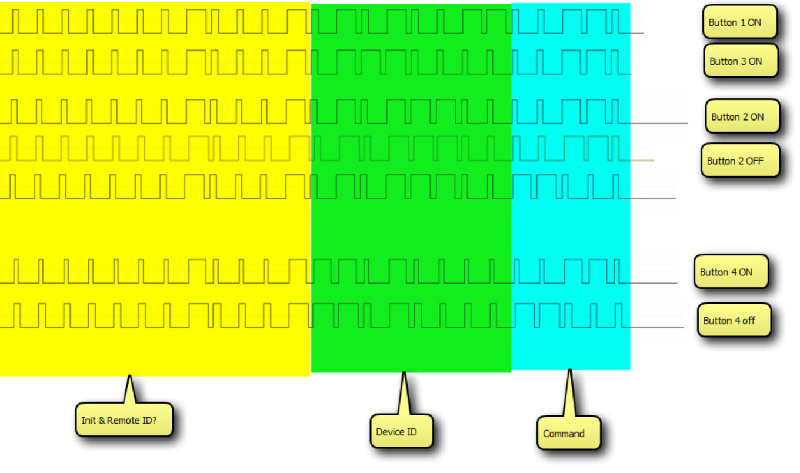
The yellow part never changes, so this must be initialization bits and possibly an ID code of the remote. The green part seems to change every time I change which button I press, and the blue part changes only when I press either ON or OFF. From this, it's pretty easy to extrapolate the protocol. I assume that "short high long low" represents 0, and "long high short low" represents 1. This let me write down the protocol for the buttons:
BUTTON 1 ON  000000010001 01010011 00110
BUTTON 3 ON  000000010001 01110000 00110
BUTTON 2 ON  000000010001 01011100 00110
BUTTON 2 OFF 000000010001 01011100 11000
BUTTON 4 ON  000000010001 11010000 00110
BUTTON 4 OFF 000000010001 11010000 11000
From here, I first wrote code for the Arduino to drive the transmitter, and then wrote the same code for the ESP8266 running NodeMCU.
- Click Here to download the NodeMCU Lua Code that runs this. I apologize for the lack of comments -- scripting on the ESP8266 via NodeMCU is actually very limiting and comments eat up space!
- I use these NodeMCU dev boards.
- Normally I'd post a schematic, but the wiring is just so simple, it's really not necessary. Here's how you wire this to your NodeMCU Dev Board:
- Pin VCC on 433mhz Transmitter to 'VIn' pin on NodeMCU Board
- Pin GND on 433mhz Transmitter to 'GND' pin on NodeMCU Board
- Pin DAT/ADATA on 433mhz Transmitter to 'D0' pin on NodeMCU Board
- More ESP8266 Resources at this link
Once the code is running on the NodeMCU board, it provides a web interface:
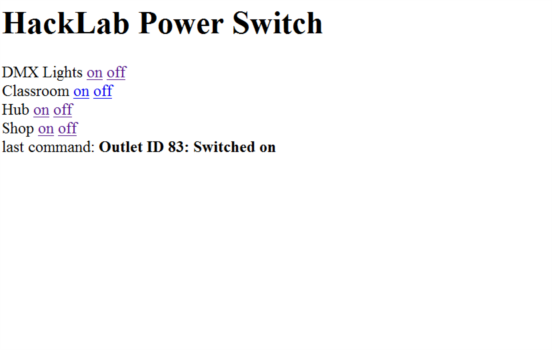
This can now be automated by using whatever scripting language you like to call URLs in this format:
http://192.168.111.68/?p=208&s=on
Here's the best part -- you are no longer limited to just 5 buttons. You can send any Device ID, from 0 to 255. You just need to put the Outlet into programming mode and then send the command, and it will respond to it. This means, you can now control up to 255 devices independently, for just $8 each.